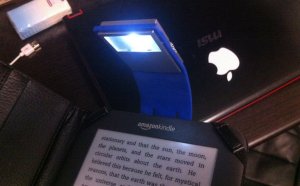
LED Reading Light Battery Powered
 There’s a common problem in interior planning that no-one discusses. it is all very hush-hush, you notice. It’s the difficulty associated with the lamp cable. (Yeah, we said it.)
Like their particular lamps don’t also have cords. Like they do all of their workplace work with the bright noonday sunshine, what do they want a functioning lamp for anyhow?
But let’s talk truth. Certain, centering your table in the middle of your workplace appears useful:
You are free to deal with the doorway regarding the space from where you to use your table, which quickly earns you an A-plus from the feng shui overlords. And maintaining your table from the wall surface opens your surfaces for lots of storage.
But there’s one problem. Until you wish spend your bills whilst shrouded when you look at the darkest pitch-black evening (and real, you might), you’re going to need a lamp on that table…
And that lamp could come with a pesky cord which can be a vacation hazard & most notably – naturally – an eyesore. Let’s be truthful, just how uncool and inconvenient is this mess?
However if you’re perhaps not prepared to compromise the area layout you prefer (and you desire to appease the feng shui geeks), it's possible to have your lamp and light it also… without cord.
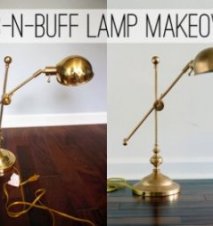
This is one way we took our sad little relief lamp, the lawn purchase realize that we fixed up in this post:
…and hacked it up to get rid of the cord so that it can take a seat on the work desk we have centered in our workplace… without that pesky golden cord.
Materials You’ll Need
- 9-volt battery or 8 AA electric batteries (to save money, usage rechargeables) change: we recommend the 8 AA batteries in hindsight. The 9-volt had been also dim.
- 9-volt electric battery video (similar to this, just about shipped) or an 8 AA battery power (like this) inform: we advice the 8 AA battery power, in hindsight. The 9V had been too dim.
- Soldering metal (we utilize this one) and solder (like this)
- Optional: velcro and felt to cover the bottom of the lamp
- Optional: brilliant husband (unavailable on amazon)
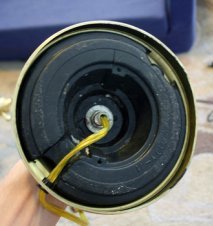
1. Open up base of lamp.
The base of the lamp had a bit of felt which we simply peeled quickly:
2. Remove top of lamp.
We just unscrewed this round thing (nut?). Every lamp changes, but there must be a way to unscrew it and remove the most effective.
3. Connect the lights to the the surface of the lamp
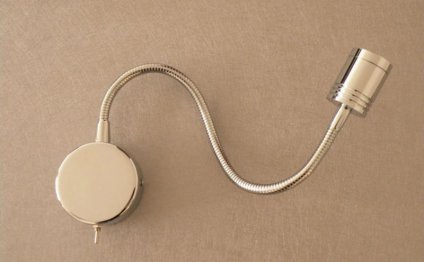
We are using these magical, fantastic LED reel lights, which we LOVE. This is what they appear like once they can be bought in the post:
It’s a flexible strand of lights that you could reduce to virtually any size, which uses very little power and is cheap. We used them to light our bookshelves (see that tutorial here):
And just for fun, right here’s whatever they look like with the whole strip lit by this one 9-volt battery:
The termination of the light strip features a red and a black colored wire and seems like this:
Okay, now consider the the main lamp where in fact the lightbulb screws in.
You’re probably solder the red cable regarding the light strip to one metal piece together with black colored cable to a different. Now, it willn’t matter which line would go to which metal piece.
Slice the light strip to a desired length. We used about two foot of lights. in the event that you look closely during the actual strip, there’s a line about every two ins where you could properly reduce it. Here’s just a little diagram:
ENHANCE: Mark simply left a comment pointing united states for this LED light which screws right into the light bulb plug. Wen’t tried it, nonetheless it might permit you to miss out the step of soldering the strip lights into lamp, and just screw it right in. You’d nevertheless need to link the battery pack once we discuss below.
5. Reattach the top of the lamp
Since the lights tend to be attached to the lamp at bulb plug, we threaded all of them through the hole in the surface of the lamp and screwed that nut thing straight back on.
The LED strip lights have actually a peel-and-stick backing, so that you remove the paper backing…
And just stick the lights into inside of the lamp anywhere. It doesn’t need to be quite. Unless that is vital that you you.
…Almost done!
 6. Wire the bottom of the lamp toward battery
Going back into the base of the lamp, cut the cord a few ins out of the base. (Scary, i understand! But we’ll understand this bad kid employed in no time at all.)
And pull the cables apart:
Making use of a wire stripper, strip the ends of each and every line:
Now you’re likely to solder the stops of those cables onto a 9-volt battery clip such as this:
They're SUPER cheap – like about 2 dollars after shipping on amazon right here – you can also take one from some old 9-volt electronic, like we did using this old noisy alarms:
ENHANCE: We made this light utilizing a 9-volt battery power and a 9-volt battery pack, but we’re gonna switch it to an 8 AA battery power and run it on AA electric batteries making it some brighter. I’d suggest operating yours down 8 AA batteries too. All the instructions are identical, you’ll just make use of an 8 AA-battery pack rather than a 9-volt battery power, and put AA batteries with it in the place of a 9-volt.)
Clip battery pack pack onto a 9-volt battery pack and contain the wires around the lamp cables. See if lamp lights up. (Make sure the switch is on!) If it cann’t, switch cables.
YAY! We have LIGHT!
Once you find which wire goes in which, take-off battery pack, twist the wires together and tape these with electrical tape. We soldered them as well, but that is optional.
Connect the 9-volt battery pack again and tuck it inside the lamp. Then only place the lamp straight back together. We stuck the considered piece straight back on and included some velcro therefore it remains on but is easily detachable to change the battery.
We had almost all of these things on hand, the only cost to united states had been the strand of LED lights. We just utilized 2 feet of lights, so we have countless programs for leftovers!
How well does it work?
Thus far, so good! We’ve operate the light for about 8 hours complete therefore’s nevertheless going strong. If you’d like your lamp to be in the brighter part, opt for the 8-battery pack, since it offers 12 volts of power. The 9-volt will operate somewhat dimmer.
Update: We’ve decided the better AA is much better, therefore we changed our lamp over. To offer a sense of brightness, our lamp is slightly brighter than a 40-watt incandescent bulb and a little dimmer than a 60-watt.
Which’s the storyline of just how our unfortunate, lost small rescue lamp dusted itself off, found an innovative new residence, got all fixed up-and has become going locations together with life. Going wheresoever it wishes, actually. Since it does not require access to an outlet.

RELATED VIDEO


Share this Post
Related posts
Clip-On Flexible LED Reading Light
Make it possible for volume discounts on this web site, use promotion code: BULKRATE during checkout. You ll see a discount…
Read More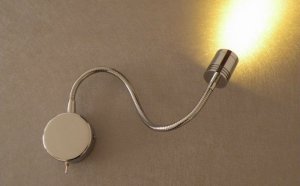
Battery Powered LED Reading lights
The tiny dimensions and directional light output of LEDs make sure they are perfect for private reading lights, and they…
Read Morelatest posts
-
 LED Projector Lamp price January 16, 2024
 -
 LED light bulbs for sale cheap January 11, 2024
 -
 Light Bulb Shapes January 6, 2024
 -
 LED curing light for Gel nails January 1, 2024
 -
 LED Spot light bulbs December 27, 2023
 -
 Info on LED lights December 22, 2023
 -
 LED light Nail Dryer December 17, 2023
 -
 LED light for Gel polish December 12, 2023
 -
 LED Decorative Lamps December 7, 2023